My Sphinx Best Practice Guide for Multi-version Documentation in Different Languages
Having good documentation is quite important and Sphinx is honestly a good tool for this. There are a few points I came across while setting up my Sphinx documentation for a project at work, where I want to share my thoughts and my final solution in this article.
In order to have a better focus on Sphinx itself, I will create a new project on GitHub. And we go step-by-step through:
- Setting up the project
- Adding content and chapters
- Add C++ and JavaScript source code documentation to it
- Add localization and translate the document
- Add versioning
You can find the final documentation here online and the GitHub repo here with the entire project. At the end of this article we have a full Sphinx documentation which looks like this:

Before we start, please note that I have enabled the dark reader on my local files, which means that my built docs are always dark here and I run everything from a docker container (you'll find the Dockerfile in the repo later).
So lets get to work. I'll start in an empty directory and I'll put all my Sphinx files into a subdirectory docs:
mkdir docs && cd docs
sphinx-quickstart
> Separate source and build directories (y/n) [n]:
> Project name: SphinxExample
> Author name(s): Thomas
> Project release []:
> Project language [en]:
Where our project directory now looks like this:
.
└── docs
    ├── _build
    ├── conf.py
    ├── index.rst
    ├── make.bat
    ├── Makefile
    ├── _static
    └── _templates
And if we just run
make html
Sphinx creates the documents with all default settings. Open ./docs/_build/index.html with your browser:
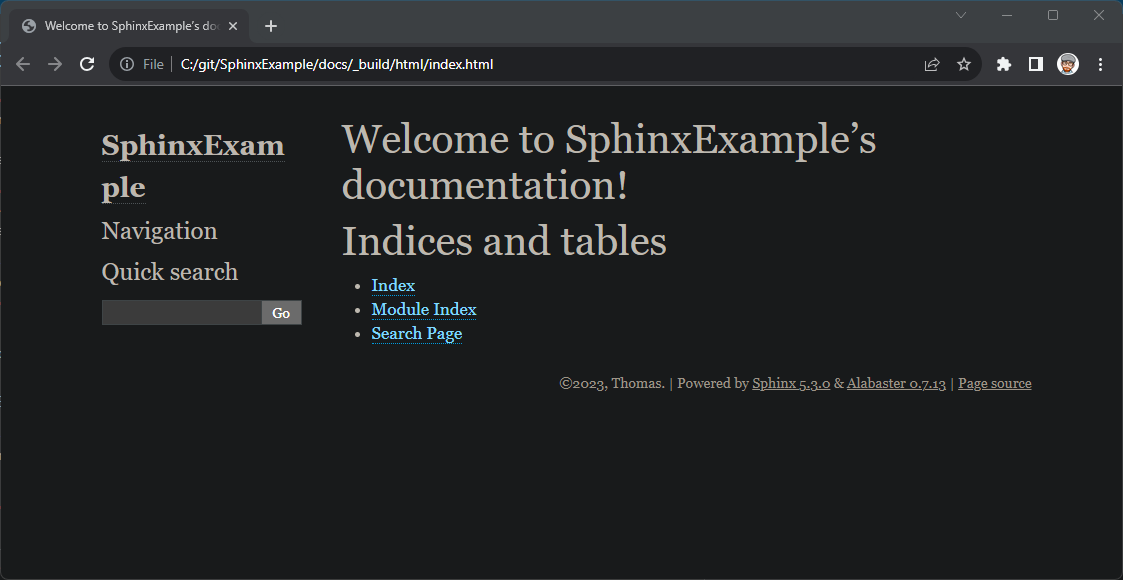
So we created the project, but it doesn't look too nice. At least I think there are better looking themes. We can change the theme by modifying ./docs/conf.py, where we change the html_theme:
html_theme = 'sphinx_rtd_theme'
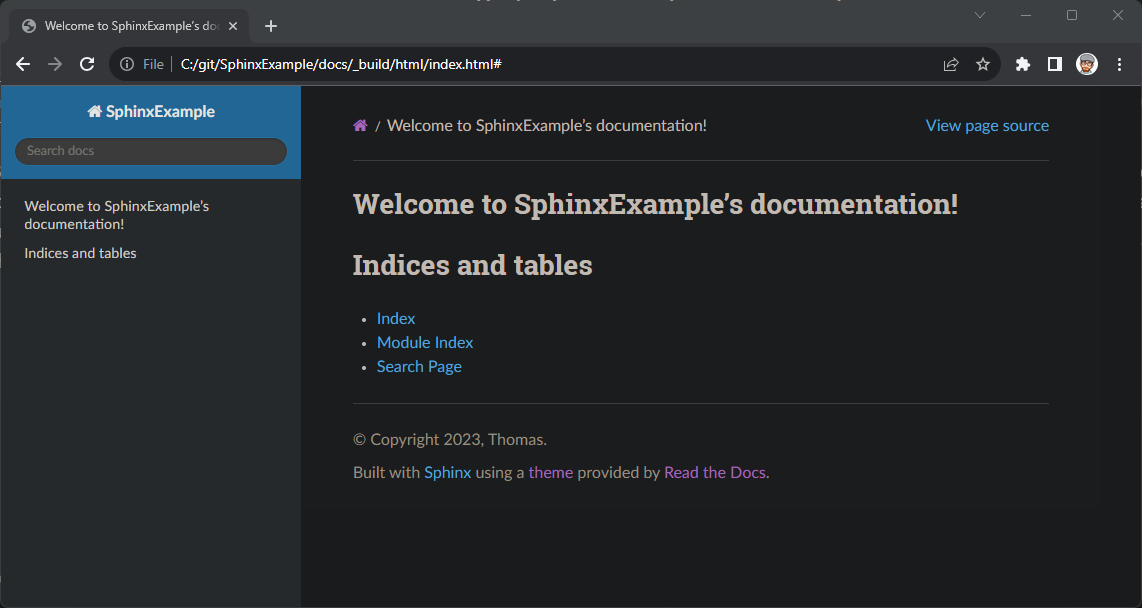
Run the build again (make html) and we have applied a different theme. There are others, but I like the sphinx_rtd_theme the most.
Great, we have the general project set up and are now ready to add content to it. ./docs/index.rst represents the landing page and we add ./docs/chapter1.rst and ./docs/chapter2.rst as random chapters. The suggested syntax is reStructuredText. If you're not familiar with this, try using a cheat sheet while you write. It's similar to markdown. Lets see for instance chapter1.rst:
..  _chapter1:

Chapter 1: Including C++
========================

Lets's use chapter to add some C++ code here:
With ``.. code-block:: cpp`` we can add C++ snippets:

.. code-block:: cpp

  int main()
  {
    std::cout << "hello sphinx!\n";
    return 0;
  }
- with
.. _chapter1we create a reference to the followed headline. - after
.. code-block:: cppwe have to use indents and an empty line
And then we need to add our newly created files to the table of contents (without the .rst extension) in index.rst:
Welcome to SphinxExample's documentation!
=========================================

.. toctree::
   :maxdepth: 2
   :caption: Contents:

   chapter1
   chapter2

Indices and tables
==================

* :ref:`genindex`
* :ref:`modindex`
* :ref:`search`
And after we run make html again, we have our chapter now:

Include Source Code Documentation
Now we add some source code documentation. This requires Sphinx extensions, which we add to conf.py. To use them you have to ensure that they are installed. Most of them I have found so far are Python packages that we can easily install with pip. You'll find all the tools in a Docker container, which we'll use in this article.
C++ Code
Before we introduce a C++ example to document, we have to create a Doxyfile with doxygen. To create a Doxyfile we run (we need to create this file just once):
doxygen -g Doxyfile
Now we created ./docs/Doxyfile, where we have to adapt our input and output directory and tell doxygen to create a xml:
# approx. line 60
OUTPUT_DIRECTORY       = ./_build/doxygen

# approx. line 870
INPUT                  = ./../src

# approx. line 2100
GENERATE_XML           = YES
Now we need some C++ code, which we want to document. Let's create a source directory and a file ./src/foo.hpp:
/**
 *  foo is super important for this sphinx project
 */
class foo
{
  public:
    /**
    * This does some work
    * @param bar this parameter is mandatory.
    * @return The work results
    */
    int do_some_work(int bar);
  private:
    /**
    * a private member.
    * which we can not ignore
    */
    std::size_t m_member;
};
And now we run doxygen:
doxygen Doxyfile
In ./docs/_build/doxygen/xml we have all the xml output we need. To include this into our Sphinx documentation we need to add Breathe. Breathe is the link between Sphinx and Doxygen.
In ./docs/conf.py add/replace:
extensions = [
  'breathe'
]
breathe_projects = {
  "SphinxExample": "./_build/doxygen/xml"
}
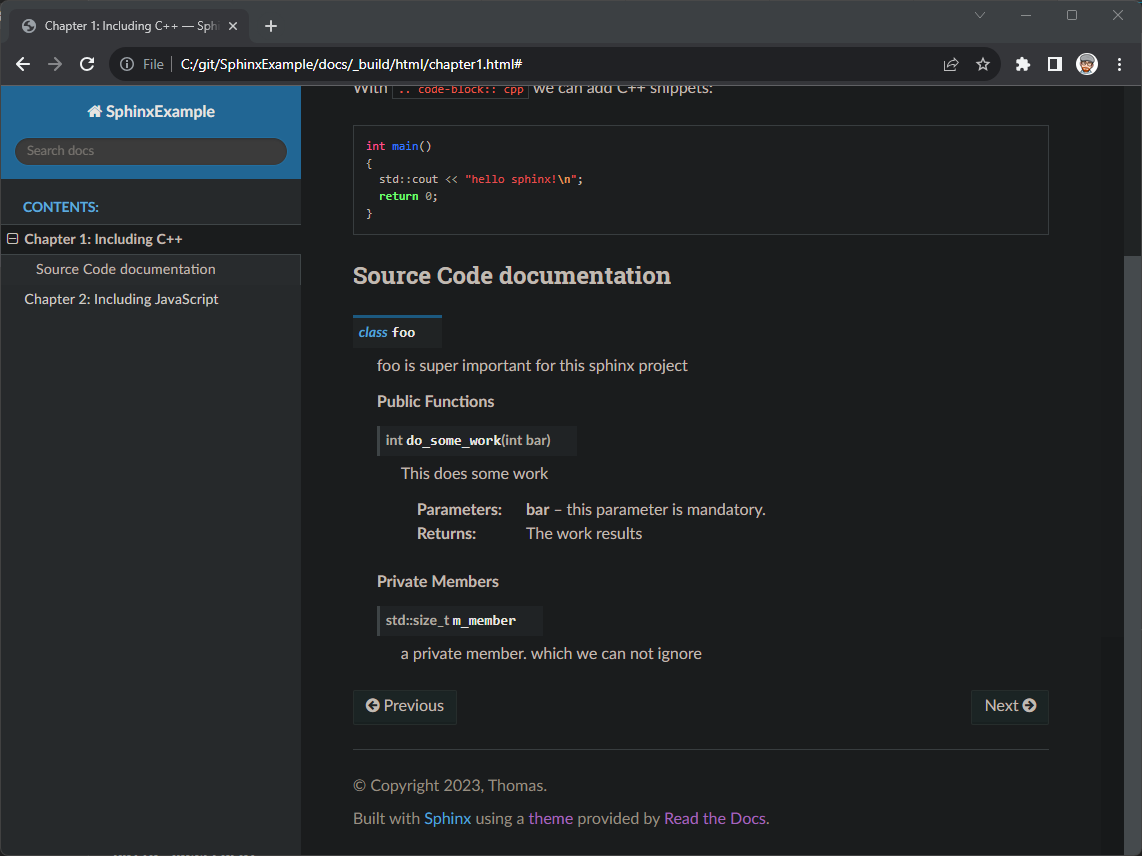
And finally we're good to go, to include class foo in our documentation. We add a subchapter to ./docs/chapter1.rst, where we use .. doxygenclass:: foo. To reference foo we have to pass the class name itself:
Source Code documentation
-------------------------

.. doxygenclass:: foo
  :project: SphinxExample
  :members:
  :private-members:
After running our build we have:
Since this is a very basic example and there is way more complex C++ code, you can find Breathe's Documentation here.
JavaScript Code
Importing JavaScript into our documents is easier. So let's create a similar class foo in ./src/foo.js:
/**
 * @classdesc Foo is super important for this sphinx project
 */
class Foo {
  /**
   * Create a Foo instance.
   * @constructor
   * @param {number} value - The initial value for member.
   */
  constructor(value) {
    /**
     * @private
     * @type {number}
     */
    this.member = value;
  }

  /**
   * Perform some work using the private member.
   * @public
   * @param {number} bar - this parameter is mandatory.
   * @returns {number} The work results
   */
  doSomeWork(bar) {
    // Perform some work using this.member
    const result = `Work done with '${this.member}' using parameter '${workParam}'.`;
    return result;
  }
}
And before we put foo to our docs we have to modify conf.py and add sphinx-js:
extensions = [
  'breathe',
  'sphinx_js'
]
js_source_path = './../src/'
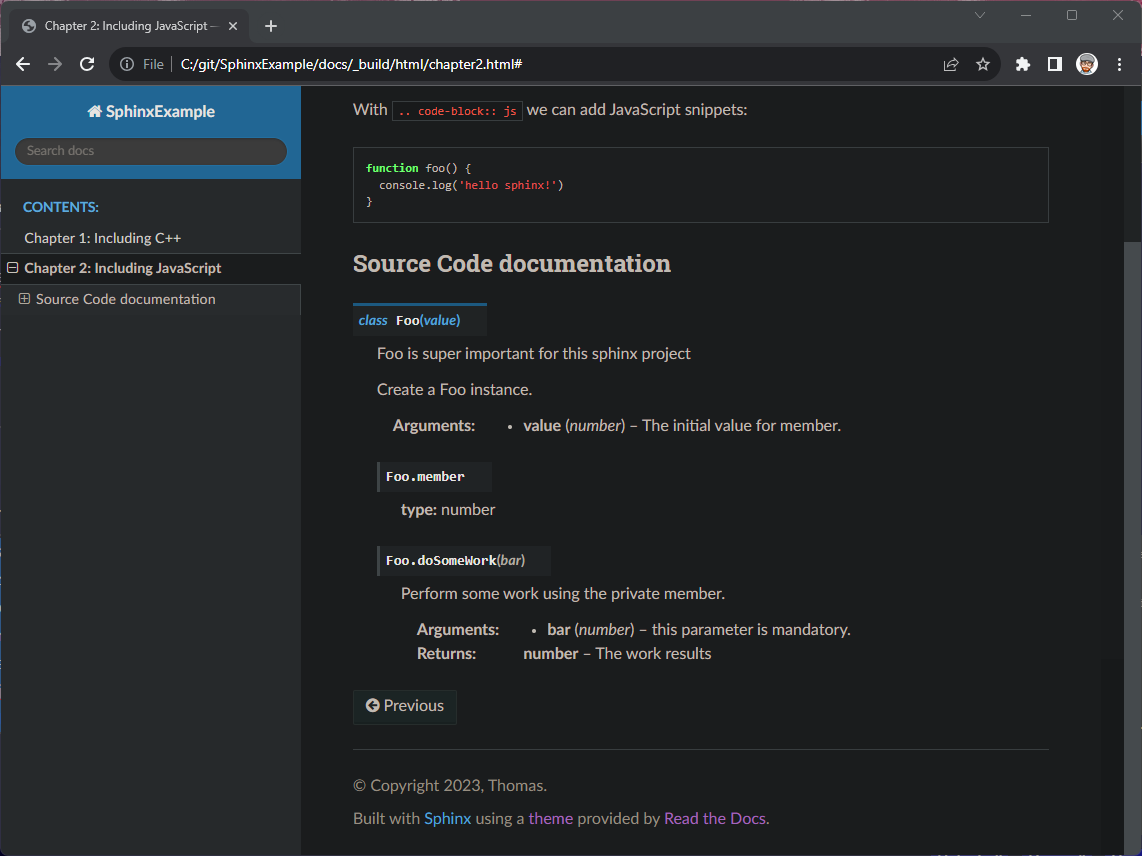
Now we add foo into a subchapter in ./docs/chapter2.rst:
Source Code documentation
-------------------------

.. js:autoclass:: Foo
  :members:
  :private-members:
After running our build we have:
Localization
It's very useful to be able to document in multiple languages, especially if you're trying to reach an international audience. Fortunately there is another extension, sphinx-intl. It's a Python package, which we can install using pip. Find the official documentation here.
This requires now some manual steps where we don't have to add anything to conf.py.
First of all we have to get all strings from our document. We run:
make gettext
This creates a couple of files in ./docs/_build/gettext. We continue to run:
sphinx-intl update -p _build/gettext -l de
And now sphinx-intl creates another directory: ./docs/locales/de/LC_MESSAGES/. There we have all our files as .po, which we have to translate. In this case we create a German translation with -l de. You can use -l multiple times if you need more languages. When running sphinx-intl, we basically just copy the generated files into our docs directory. But if we change the documentation, sphinx-intl takes the changes into account and we don't have to start over and rewrite all the translations.
Now we can add a German translation in ./docs/locales/de/LC_MESSAGES/index.po. If you don't translate the given string, it keeps the original string in your document.
#: ../../index.rst:7
msgid "Welcome to SphinxExample's documentation!"
msgstr "Willkommen zur SphinxBeispiel Dokumentation!"
And now we can run make again. But this time we have to pass in the language key.
Default language key is en, but this time we want to create a German documentation:
make -e SPHINXOPTS="-D language='de'" html

Cool, we now have translated documentation. You may have noticed that we have now overwritten our html directory. But in make we can just add BUILDDIR=./_build/de to specify a destination directory. We'll come to that in a minute.
Versioning
We need a versioning concept if we don't want to always rely on the latest version of our documentation. For example, it might be good to have old documentations available if we have a lot of major changes in your product. Or we just want to switch between languages.
It really took me a while to come up with my best practice for this, but fortunately I was able to come up with a solution that was satisfying (at least to me).
With Sphinx we can add a collapsible menu below the navigation, see for example the Conan documentation:
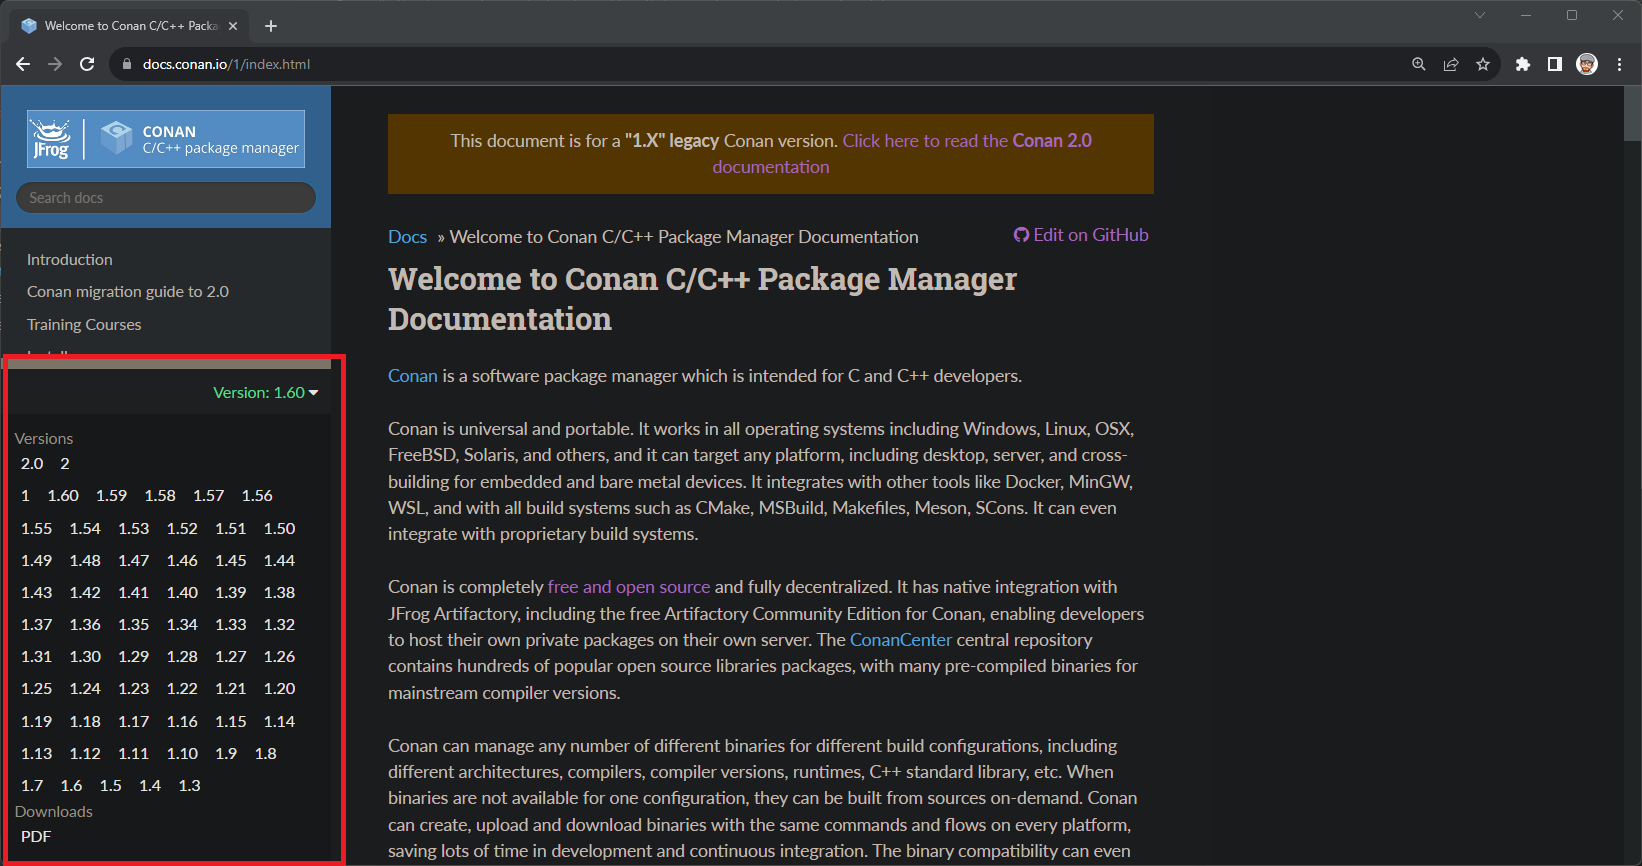
And this is a nice feature to switch to another version or language.
Now there is one thing: Older versions need to know when a new version is available. And the most obvious answer to this problem is to just rebuild the old documents. Probably you can also patch old html files, but my gut feeling is that this can get ugly very quickly.
With that in mind, let's start by getting this box under our navigation in the first place. We need to create ./docs/_templates/versions.html and for now just put a text label to it:
<div class="rst-versions" data-toggle="rst-versions" role="note" aria-label="versions">
  <span class="rst-current-version" data-toggle="rst-current-version">
    Version: Current version here
    <span class="fa fa-caret-down"></span>
  </span>
  <div class="rst-other-versions">
    We list the other versions here
  </div>
</div>
In conf.py there is already a variable templates_path = ['_templates'] which means that Sphinx knows some templates which we will use here. Run make html and we see this menu:

Pretty straightforward so far. Now we need a connection between our conf.py and ./docs/_templates/versions.html. For that we have to create a dictionary in conf.py. To demonstrate the effect we put just some static dummy data to it:
html_context = {
  'current_version' : "1.0",
  'versions' : [["1.0", "link to 1.0"], ["2.0", "link to 2.0"]],
  'current_language': 'en',
  'languages': [["en", "link to en"], ["de", "link to de"]]
}
Once we define html_context, we have access to it in versions.html. To access the values we modify versions.html and to be completely honest, I haven't seen this syntax before.
Apparently with {{ variable }} we have access and in a similar way we can express loops and if statements:
<div class="rst-versions" data-toggle="rst-versions" role="note" aria-label="versions">
  <span class="rst-current-version" data-toggle="rst-current-version">
    Version: {{ current_version }}
    <span class="fa fa-caret-down"></span>
  </span>
  <div class="rst-other-versions">
    {% if languages|length >= 1 %}
    <dl>
      <dt>{{ _('Languages') }}</dt>
        {% for the_language, url in languages %}
          <dd><a href="{{ url }}/index.html">{{ the_language }}</a></dd>
        {% endfor %}
    </dl>
    {% endif %}
    {% if versions|length >= 1 %}
    <dl>
      <dt>{{ _('Versions') }}</dt>
      {% for the_version, url in versions %}
        <dd><a href="{{ url }}/index.html">{{ the_version }}</a></dd>
      {% endfor %}
    </dl>
    {% endif %}
    <br>
    </dl>
  </div>
</div>
And after building again we have this output here. We have both versions and langauges from the html_context available.
I hovered over on version here and you see that "link to 1.0" is now inside the link. This means we have to create our links properly to navigate between our documentations

I added two version tags, 1.0 and 2.0 to this git repo and modify the landing page slightly to demonstrate the effect.
I do some changes on the landing page and I add two version tags. This means that we have now three versions:
- 1.0
- 2.0
- latest/main
Deployment
And before we put everything together let's talk about deployment. It depends a bit if we're working with GitLab or GitHub and how our platforms look like.
- GitLab Pages: With GitLab pages we can define a job in our CI/CD pipeline called
pagesand deploy a folder calledpublicthis is then accessible via GitLab pages. - GitHub Pages: Pretty similar to GitLab pages, we have a job which deploys to GitHub pages specifically and we can see our documents online.
- There is also Read the Docs, where you can create an account and host a document (but I never tried this)
We will use GitHub Pages since this is the platform where this project is.
GitHub Pages
Let's look at an example pipeline how to push pages, which is probably pretty much self explanatory:
jobs:
  build:
    runs-on: ubuntu-latest
    permissions:
      id-token: write
      pages: write
    steps:
      - uses: actions/checkout@v3
      - name: build
        run: |
          # ... installation of all tools ...
          # get all tags, and run a python script
          # which you find below to build all documents
          git fetch --tags
          cd docs
          mkdir _build
          python3 build_docs.py
      - name: Setup Pages
        uses: actions/configure-pages@v3
      - name: Upload artifact
        uses: actions/upload-pages-artifact@v2
        with:
          # Upload entire repository
          path: './pages'
      - name: Deploy to GitHub Pages
        id: deployment
        uses: actions/deploy-pages@v2
        with:
          github_token: ${{ secrets.GITHUB_TOKEN }}
And that means for us now, we have to put all our build results together and add that path to the Upload step.
Building all Languages and Tags
As mentioned earlier, we have to rebuild all versions and languages when we have a newer one. And to have a bit control over this, I added a yaml file which will tell us which versions use which git tag and support which languages, ./docs/versions.yaml:
"1.0":
  tag: '1.0'
  languages:
    - "de"
    - "en"
"2.0":
  tag: '2.0'
  languages:
    - "de"
    - "en"
Then, we continue with a Python script to build all listed versions. ./docs/build_docs.py:
# a single build step, which keeps conf.py and versions.yaml at the main branch
# in generall we use environment variables to pass values to conf.py, see below
# and runs the build as we did locally
def build_doc(version, language, tag):
    os.environ["current_version"] = version
    os.environ["current_language"] = language
    subprocess.run("git checkout " + tag, shell=True)
    subprocess.run("git checkout main -- conf.py", shell=True)
    subprocess.run("git checkout main -- versions.yaml", shell=True)
    subprocess.run("doxygen Doxyfile", shell=True)
    os.environ['SPHINXOPTS'] = "-D language='{}'".format(language)
    subprocess.run("make html", shell=True)

# a move dir method because we run multiple builds and bring the html folders to a
# location which we then push to github pages
def move_dir(src, dst):
  subprocess.run(["mkdir", "-p", dst])
  subprocess.run("mv "+src+'* ' + dst, shell=True)

# to separate a single local build from all builds we have a flag, see conf.py
os.environ["build_all_docs"] = str(True)
os.environ["pages_root"] = "https://those1990.github.io/SphinxExample"

# manually the main branch build in the current supported languages
build_doc("latest", "en", "main")
move_dir("./_build/html/", "../pages/")
build_doc("latest", "de", "main")
move_dir("./_build/html/", "../pages/de/")

# reading the yaml file
with open("versions.yaml", "r") as yaml_file:
  docs = yaml.safe_load(yaml_file)

# and looping over all values to call our build with version, language and its tag
for version, details in docs.items():
  tag = details.get('tag', '')
  for language in details.get('languages', []):
    build_doc(version, language, version)
    move_dir("./_build/html/", "../pages/"+version+'/'+language+'/')
And then we append to conf.py:
# get the environment variable build_all_docs and pages_root
build_all_docs = os.environ.get("build_all_docs")
pages_root = os.environ.get("pages_root", "")

# if not there, we dont call this
if build_all_docs is not None:
  # we get the current language and version
  current_language = os.environ.get("current_language")
  current_version = os.environ.get("current_version")

  # we set the html_context wit current language and version
  # and empty languages and versions for now
  html_context = {
    'current_language' : current_language,
    'languages' : [],
    'current_version' : current_version,
    'versions' : [],
  }


  # and we append all versions and langauges accordingly
  # we treat t he main branch as latest
  if (current_version == 'latest'):
    html_context['languages'].append(['en', pages_root])
    html_context['languages'].append(['de', pages_root+'/de'])

  if (current_language == 'en'):
    html_context['versions'].append(['latest', pages_root])
  if (current_language == 'de'):
    html_context['versions'].append(['latest', pages_root+'/de'])

  # and loop over all other versions from our yaml file
  # to set versions and languages
  with open("versions.yaml", "r") as yaml_file:
    docs = yaml.safe_load(yaml_file)

  if (current_version != 'latest'):
    for language in docs[current_version].get('languages', []):
      html_context['languages'].append([language, pages_root+'/'+current_version+'/'+language])

  for version, details in docs.items():
    html_context['versions'].append([version, pages_root+'/'+version+'/'+current_language])
And this creates and deploys our final folder to GitHub Pages. The folder structure now looks like this:
pages
    │   index.html -> main en
    ├───1.0
    │   ├───de
    │   │       index.html
    │   └───en
    │           index.html
    ├───2.0
    │   ├───de
    │   │       index.html
    │   └───en
    │           index.html
    └───de
            index.html -> main de
With our final result:

And Thats It
We're finally done setting everything up. It's a lot to wrap your head around for the first time, but I personally really like the sphinx documentation and the read the docs theme.
You can find the documentation now online here and the GitHub repo here.
At work I'm in a private GitLab, but things work almost the same. You have your CI/CD pipeline with a dedicated pages job and push all your files into a folder called public. This automatically creates the pages and a link to them.
Anyway, I hope this helps, and if you have some better approaches to managing all the versions and stuff, please let me know. I did this to the best of my knowledge and it somehow feels right to me.
Best Thoams